Tuesday, October 13, 2009

Darwin Complete.

Here are a few overview shots of the Darwin exhibit that opened Friday 10/9 at the Sam Noble. Generally we have 2 years to plan and execute such an exhibit. We turned this one around in 3 months.


To complicate matters, our graphic designer left for grad school during this period and we had to conduct a search to find a new one. I am happy to report that we were successful and the new recruit was able keep the project on-track.


Needless to say, I am extremely proud of my staff and the quality/quantity of work they produced for this exhibit.


Time to start working on the next one.
Sunday, October 11, 2009

First peek at the Darwin exhibit.


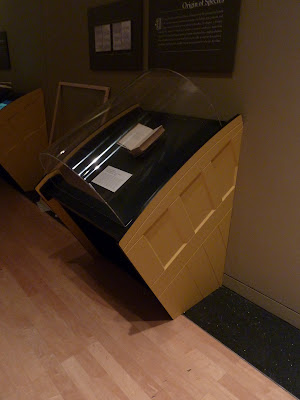
Here are a few shots items made with the 'Bot for the Darwin exhibit that opened on Friday. The exhibit features all of Darwin's publications as first editions, courtesy of OU's History of Science collection.


All of the books are housed in casework that has mill work based upon a "shanty" feature from the HMS Beagle. This example houses "Origin of the Species." With the exception of the tubular vitrine and a extruded aluminum armature, all details were produced in-house with the ShopBot. Each case features an ABS deck, case furniture constructed from acrylic sheet and solid surface counter-top material, as well as the MDF sidepieces as pictured here. The casework is reusable - the sidepiece can be themed to match the exhibit, or a generic maple version that blends with our existing cases can be used.


Here is a marine iguana from the Galapagos housed in a plexi tank filled with an alcohol solution. Bottom base is solvent cemented into tight-fitting groove. The lid was machined with a larger groove to accommodate the application of a low VOC silicone. A series of vent holes were placed in the groove to allow for the silicone to neatly ooze out so the lid could be easily assembled.


What seems like some simple case furniture that bisects the space is actually an attractive gentle curve. This feature is not just aesthetic - the curve give the assembly great structural integrity using a relatively thin sheet of material for the divider, while the cap on top makes the cross-section similar to an "I" beam.

I'll post some more photos of the completed installation later this week.
Posted by Picasa

Wednesday, September 23, 2009

Signs of Change

We had an emergency. A person unnamed requested that we fabricate a sign "Butterfly Garden Under Construction" lest the public mistake the area for alien crash site.


Not bad for a scrap piece of Plexiglas and 1.5 hours.

Tuesday, June 9, 2009

Location, Location, Location!

Our department was tasked with building a portion of our new Orientation Gallery that featured a series of panels mounted on a solid with a cross-section of an equilateral triangle. These spun on an axle, allowing the visitor to rotate them to complete a puzzle or have a question/answer display.


How to get the faces to locate consistently? The plans by others called for each "Trilon" to use a spring-loaded "bullet" that would locate in one of three dimples on the end of the "trilon."

This was problematic for a few reasons:
  • The "trilons" would not locate correctly 75% of the time.
  • The mechanisms would be subject to extreme wear.
  • This arrangement might work is there were only two on an axle, but there were sometimes as many as four. No clearance for this device in "trilons" 2 and 3.
Our solution was to machine a set of UHMW rings that would be press fitted with series of rare-earth button magnets. One formed the end of the "trilon", the other was affixed to the axle with a shaft collar.


Polarity was arranged such that when a "trilon" was positioned at 0, 120, or 240 degrees the magnets attracted. When located in between these angles the magnets repelled. The "trilons" were assembled as a unit within a frame and placed on a flat surface - aligning the faces to that plane. The cap screws on the shaft collars were then tightened.

Witness!


This mechanism has no moving parts other than the bushings that support the "trilons." I am hoping for the device to have an extremely long and trouble-free life.

Monday, June 8, 2009

The Practical Side

Life with the ShopBot is not always glamorous. In addition to the design and fabrication of exhibits, our department provides services to the other departments. Here we are using the ShopBot to help our Vertebrate Paleontology collection by making dozens of poplar blocks that hold small glass vials. These vials might contain tiny bones of ancient mammals, scales, or possibly teeth.

In the past these have always been done by a volunteer on a drill press. Now that person is relieved to take on a task that might be a little more exciting.

Clip Art is Not Always Evil

At our annual museum fundraiser we needed a cheap and bold way to decorate out Great Hall. The title of the event was "Treasures from the Vault" and the theme was Indiana Jones-ish in nature.

I purchased a Dover book called "Design Motifs of Ancient Mexico" and brought in some JPGs to PartsWorks using the tracing tool. I machined the images from 1/2" blue insulating foam, then hit the finished product with an 18" paint roller to darken the high points. Here is our test:


Here is the finished product the night of the event. Each column was uniquely decorated with a surround of the "mushroom" light, a vertical, element, and a squarish base treatment. No two alike images were used. Archways over doors and facades for the registration desk were also created.


Total cost: $12 for the book, $150 in blue sheet foam, $40 in 3M "Command" removable adhesive strips. My time on the project was probably more than I wanted to spend (computer work plus time on the machine was about 40 hours over a period of 2 months) but it gave me the opportunity to learn a great deal.

Sunday, June 7, 2009

First try with Ethafoam

Here we are using the 'Bot to cut out a profile for an Ethafoam interior for an object mount.

More fuzzies that I care for, but we might be able to reduce that with further experimentation. The ideal would be to outfit the 'Bot with a hot needle to perform this task, but that presents some other challenges such as fume abatement. I am hoping that this technique can be developed to the point where we can produce custom forms for the display of garments.
Posted by Picasa

Its Log!

Our Education Department was hosting a family workshop for making clocks out of slices of logs, and wanted a way to treat the face of the clock so that it was more attractive than the rough-sawed wood.

I devised a system where we could dish-out the face of the log 0.75" and leave the bark and last few growth rings intact. In preliminary test this outer ring would blow apart during fly-cutting the entire surface.

I created a holding jig with a 90 of hardwood and a couple of De-sta-co clamps.


At the 90 and 180 degree quadrants I installed some screw tips peeking out.


The log was tapped against the exposed screws and clamped.


I created a tool path based upon the smallest log diameter, and printed off a centering template to be placed on the fixtured log.

With the template in place, I locate the tooling over the center of the template and zero my x and y axises. Then the tooling is zeroed to the surface of the log using the z-zero plate. Run time was about 5 minutes each.

Here is the finished product. The hole for the clock mechanism was made using a forstner bit on a drill press rather than using the 'Bot. If I was making a a few hundred of these rather than 15, I might have expended the extra effort to make jig for the CNC machine. It did not make sense to expend that effort in this instance.

The Cats Found Them to be Amusing

This X-Mas I was looking for something simple that I could have the 'Bot make that our department cold give out as presents. I decided that a "two circle roller" would be perfect. This device consists of two disks of equal diameter joined to teach other in a perpendicular orientation such that the distance between their two centers is √2 *radius. This arrangement has a center of gravity that is a constant distance from the surface it rest on. The result is that it rolls effortlessly on any flat surface. Check out the Wikipedia entry on the oloid - a similar device.


For this project I used 0.245" Komatex that was used as a graphic substrate in a past exhibit. I settled on a 3" diameter that would be a reasonable size for the toy while giving me 19.5 units/sheet. The above cut preview show how the majority of the disks share a cutting path for the assembly slot. This saves some time because the tool leaves the material fewer times. I probably should have duplicated that technique in the first and last rows in a horizontal fashion, but I got lazy.


This detail from PartWorks shows a subtle detail that allows the disks to snap together. A small smack with a rubber mallet is all that is needed to join them.


Here is a video of the finished product:


I placed one in each staffers mailbox the week before the holiday break. I didn't include any documentation, because I wanted people to have an "ah-ha!" moment when they discovered the properties of the device. I thought that it would be fairly evident - I had a hard time keeping them in the mailboxes as they kept rolling out. Unfortunately, most thought they were puzzles and (with some difficulty) took them apart.

I sent out a mass email about the gift, and suggested that they would make ideal cat toys. They were then very well received.

Saturday, June 6, 2009

The New Table Saw

Ok, it is not a table saw - it is almost exactly not like a table saw. What I mean by the title is that this machine is becoming so familiar to us that it is occupying the same place in our existence as the table saw.

We purchased the ShopBot primarily for it's capabilities, not for speeding up production. We create many one-of-a-kinds, not too many multiples. Here are a couple of examples of how this machine is changing the way we do things in our shop:


Here we were making a frame for a prototype of a section of curved wall covered in perforated steel. We had to test a particularly heavy mount of a triceratops jaw before went to the real thing. A few months ago we would have designed the profile, made a template, traced out our multiples and cut out the units with a sabre saw. No more! AutoCAD>PartsWorks>ShopBot and walk away. (Note the placement of the screws for holding down the material - plans are in the works to eliminate these with a vacuum clamp)

Deceptively simple, except this was a panel to fit into the interior of an existing case. I closely measured the lengths of the sides and the diagonals by overlapping steel rules. Using that data to construct intersecting circles, I recreated the profile in CAD. Fits like a glove.
Posted by Picasa

A Chair by Any Other Name


I was approached by the OU Architecture department to assist one of their design students with the execution of a chair. They have been extremely generous in the past, sharing their laser cutter and expertise on some of the museum's projects.


I spent more time cleaning up the student's files that the ShopBot did cutting them out. I did not begrudge this one bit, as I learned much during the process.


The finished product. It's discomfort is exquisite.
Posted by Picasa

Bat Tops!


After getting our machine in September of 2008, we wanted to have a "coming out" at our annual event for our museum members. I designed a toy top based on an image of a bat skeleton that we could give away as tokens of our esteem.


The image was brought into PartsWorks using the bitmap tracing tool, then saves as a DXF. I reopened in AutoCAD, scaled, and traced with a polyline. Once that was completed I found and marked the objects center of mass, and resaved. Re-opened in PartsWorks to repeat into a grid and establish cutting paths. The calculated cut time for the engraving of the skeleton was taking over an hour. Since this was going to be a demonstration, we set up a registration system where we could engrave all of the sheets, then demo the cutting of the profiles. Even so, there was no way we could have a "just in time" inventory during the event. We pre-made a few hundred of the tops earlier in the day.

Here is a video of the finished product. The axle is made from a medium-sized Miller Dowel, a specialty cabinet making product. The point was made my chucking it up in a cordless drill and running it against a spinning abrasive disk.